
No, Python is not a large snake and Sublime Text is not an obscure reference to the 90's ska-punk band (at least not in this context). Rather, prepare to be amazed at the wonders of plugin development and making programs work for you.
Introduction
I’m writing this article in the hope that you (like me) are about to embark on a noble journey: the attempt to create your first Sublime Text 3 (ST3) plugin. Let me preface this article with the understanding that I am by no means a master ST3 plugin developer, but I will do my best to outline key points in the creation process that (to me) were a bit fuzzy.
(For those of you unfamiliar with ST3; it is “a sophisticated text editor for code, markup and prose” currently in Beta and set to succeed ST2. Please visit http://www.sublimetext.com/ for more information)
ST3 does have documentation referenced in the links below, but much of it is plain text and can be rather hard to dig through when starting out. Like anything there is a vocabulary that you need to pay close attention to in order to learn more of the advanced aspects involved. I started out with the ST2 Plugin Tutorial (which this tutorial will follow) but discovered some of the methods used were deprecated and caused errors when running the plugin. I honestly learned a lot just from reading Python 3 documentation and referencing the API and am hoping to pass that along to you.
Step 1 – Starting Out
All plugins start the same way: “hey, wouldn’t it be nice if this wonderful application did … .” That was my thought exactly when speaking with a colleague about HTML formatting for emails using Premailer. The objective was simple; create a one-step process that sends the CSS and HTML to Premailer and returns the HTML code in-lined with all the styles. This is as simple as sending a POST request and receiving the response. I was very familiar with how to do this using cURL in PHP, but wasn’t so sure how Python handled those kinds of requests. The results were surprisingly simple.
One thing you will want to do when starting out – pick a unique but descriptive name. If you plan on submitting this to the ST3 plugin repository, you will want something that depicts your plugin’s function but also sets it apart from everything else out there. For my example, I used the name “cnPremailer.”
Step 2 – Using ST3’s Plugin Creator
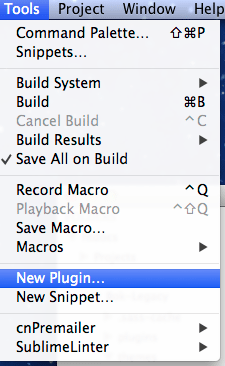
To begin, open ST3, click the “tools” menu and select “New Plugin.” This will open the new plugin template for editing.
Prior to saving you will want to create a folder for your plugin in the following location (where “Username” is your actual user name):
- (OSX): Users\”Username”\Library\Application Support\Sublime Text 3\Packages
- (WIN7): C:\Users\”Username”\AppData\Roaming\Sublime Text 3\Packages
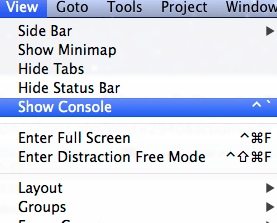
After you’ve created your desired folder you can save your new plugin as a .py file (ex: cnpremailer.py) in that location. Your plugin is immediately included as active (due to the import references at the beginning of the code). ST3 will also scan and validate your plugin. If there are errors, they will show in the console. You will want to open the console at this point so you know what’s going on behind the scenes. You can do this by opening the “view” menu and clicking “show console” (or using the built-in keyboard shortcut defined on the menu).
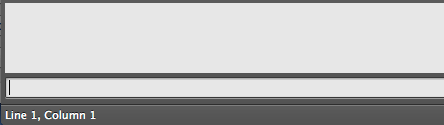
You will then see the console at the bottom of the screen:
The default plugin code is as follows (at the time of writing):
import sublime, sublime_plugin

class ExampleCommand(sublime_plugin.TextCommand):
def run(self, edit):
self.view.insert(edit, 0, "Hello, World!")
Its function is simple: the line “Hello, World!” is prepended to the beginning of the document you are viewing. To see it in action, you will need to open the console and type:
view.run_command('example')
This will execute your class and do the requested action. You’ll notice that ST3 automatically parses the class name “ExampleCommand” as a command to execute since it has the text “Command” appended to the end. Once ST3 recognizes this, it strips the “command” string off of the end and takes the beginning as the actual name in lower case (ex: ExampleCommand = example). Multiple capitals will result in underscore separators between words. In my case, cnPremailer becomes cn_premailer. Instead of having to type an underscore every time, I removed the capital and went with CnpremailerCommand as my classname instead. For my example I will quickly rename the class and then save like so:
import sublime, sublime_plugin

class CnpremailerCommand(sublime_plugin.TextCommand):
	def run(self, edit):
		self.view.insert(edit, 0, "Hello, World!")
Regardless of how you decide to format your class name, you will need to make note of it for the next step.
Step 3 – Creating Menus and Key Bindings
ST3 actually makes it very easy to include shortcuts to run your plugin via menus or key bindings (eg. cmd + shift + p). The former is a bit easier than the latter in that key bindings require OS-specific set-up, but it’s not overly complicated and is fairly flexible.
To create a menu entry you first need to decide where you want it to be viewed. You have three choices that have corresponding file names:
- Main.sublime-menu
- Side Bar.sublime-menu
- Context.sublime-menu
“Main” is ST3’s menu bar, “Side Bar” is when you right-click a document or folder on the left side of the application (not shown when opening individual files), and “Context” is the right-click menu over the text area. These all follow the same format, and to add an entry you simply need to add the following into the file and then save it with the appropriate name above. Here is a sample:
[
{
    "id" : "cnPremailer",
    "caption" : "cnPremailer",
    "command" : "cnpremailer"
}
]
As you can see; it’s a basic JSON array with some simple array values.
- “id” is a basic menu id for your entry
- “caption” is a display label (will default to the command name if not provided)
- “command” is the case-sensitive command derived from your class name (mentioned above)
You can also make submenu items by using the “children” entry like this:
[
{
	"id" : "cnPremailer",
	"caption": "cnPremailer",
	"children":
	[
	{
		"caption" : "run",
		"command" : "cnpremailer"
	}
	]
}
]
Keep in mind that these need to be properly formatted arrays, so if you add an extra comma (or forget to add one) the menus will cease to work and your plugin will throw errors when ST3 automatically compiles it.
The key-bindings are similar but need to follow this structure in order for them to work in the matching operating systems:
- Default (Windows).sublime-keymap
- Default (OSX).sublime-keymap
- Default (Linux).sublime-keymap
If you don’t wish to make your plugin key bindings available to other OSs, or are just creating a plugin for your own personal use, you don’t need to define them all. You can simply just create the file that matches the OS you are using. Then, it’s as simple as adding a JSON string to the file to map the appopriate keys you wish to use.
You may want to consult the list of default keybindings to make sure yours isn’t taken. This is located on the menu bar:
- (OSX) “Sublime Text” > “Preferences” > “Key Bindings – Default”
- (Windows) “Preferences” > “Key Bindings – Default”
You will also want to check the other plugins you have installed to see what bindings they are using so you can avoid conflicts. I used the following for OSX, since the colleague I was designing this for did not use Windows or Linux:
[
{
	"keys": ["super+shift+c"],
	"command": "cnpremailer"
}
]
For OSX, “super” is used for the command key. After that I just list the command and save. You’ll also notice that ST3 automatically adds the key binding command to your menus (if you’ve created any). That way the plugin users can reference it should they forget.

Now that you have your basic plugin saved, menus configured and keybindings added, you are ready to start the real fun. Stay tuned for part 2 – Manipulating the text area and sending data.
